Showing posts with label before&after. Show all posts

Sunday, March 1, 2015

My Colorful Front Door!

Do you ever look around your house and feel like something needs a little more pizzazz or it's just lacking a little personality?  Well, the other day, while I was putting my new entryway table together, I realized that the interior part of my front door was a plain ol' white.  Just...white.


After looking online and seeing so many bloggers paint their doors black, I realized my door needed just a little more personality.  I wanted to make a statement, but because my living room/entry way is so small, I didn't want to paint it black.  Instead, I decided to use some teal-colored paint by Valspar that I bought last year for another project.


This is what the door looks like now!


BAM!  It's suuppppeeerrrr bright and I thought about stopping midway through painting the door but just decided to commit to it.  It was such a drastic change so I gave myself a few days to see if it would grow on me, and it did because I LOVE IT!  It's a perfectly bright door and adds so much more personality to my little living room.  Have you ever wanted to paint your door a bright color?  Would you buy a house with a bright-colored door?  Let me know!


[Share to Pinterest]

Thursday, February 26, 2015

How I Repurposed Old Shelves

On a recent visit to see my closest friends and their precious baby boy, I scored 2 shelves my best friend was intending to throw out.  You don't understand the level of excitement I had when she told me I could have them.  I felt like Charlie when he found the golden ticket or Harry when he caught the Golden Snitch!  Really, I did.

This is what the 2 bad boys looked like after I had taken the particle board tops off.


I spray painted the metal parts white and decided to cut some 1x7.25" wood boards to use as the tops of the shelves.  I started to stain the wood boards with Minwax's Weathered Gray, but as soon as the stain dried on all the boards, I realized the color just wasn't me.  The color was too gray and too light...not that the name Weathered Gray is a correct description or anything.  (sarcasm implied)  So as usual, I reverted back to Espresso, my favorite stain color of all time.

Because the shelf brackets were fairly deep, I attached 2 pieces of wood using my kreg jig.


After attaching the boards to the top of the shelves, this is what they looked like.  I used one shelf in my office and the other above my drink station.

Kitchen Shelf
Office Shelf

I love the beautiful detailing on the brackets and the fact that I spent less than $40 repurposing both of them makes them even better!  What do you think?

This post is linked up to:
That’s What Che Said
[Share to Pinterest]

Saturday, February 21, 2015

ReStore Desk Makeover for Less than $30

If you guys ever saw the pictures of my office when I first moved in, then I will consider the pictures in this post my redemption.  I recently madeover a small desk my boyfriend bought me from ReStore.     I wanted a project desk.  I wanted something old, sturdy, with cool detailing.  I have to say the desk I got is exactly what I had in mind.


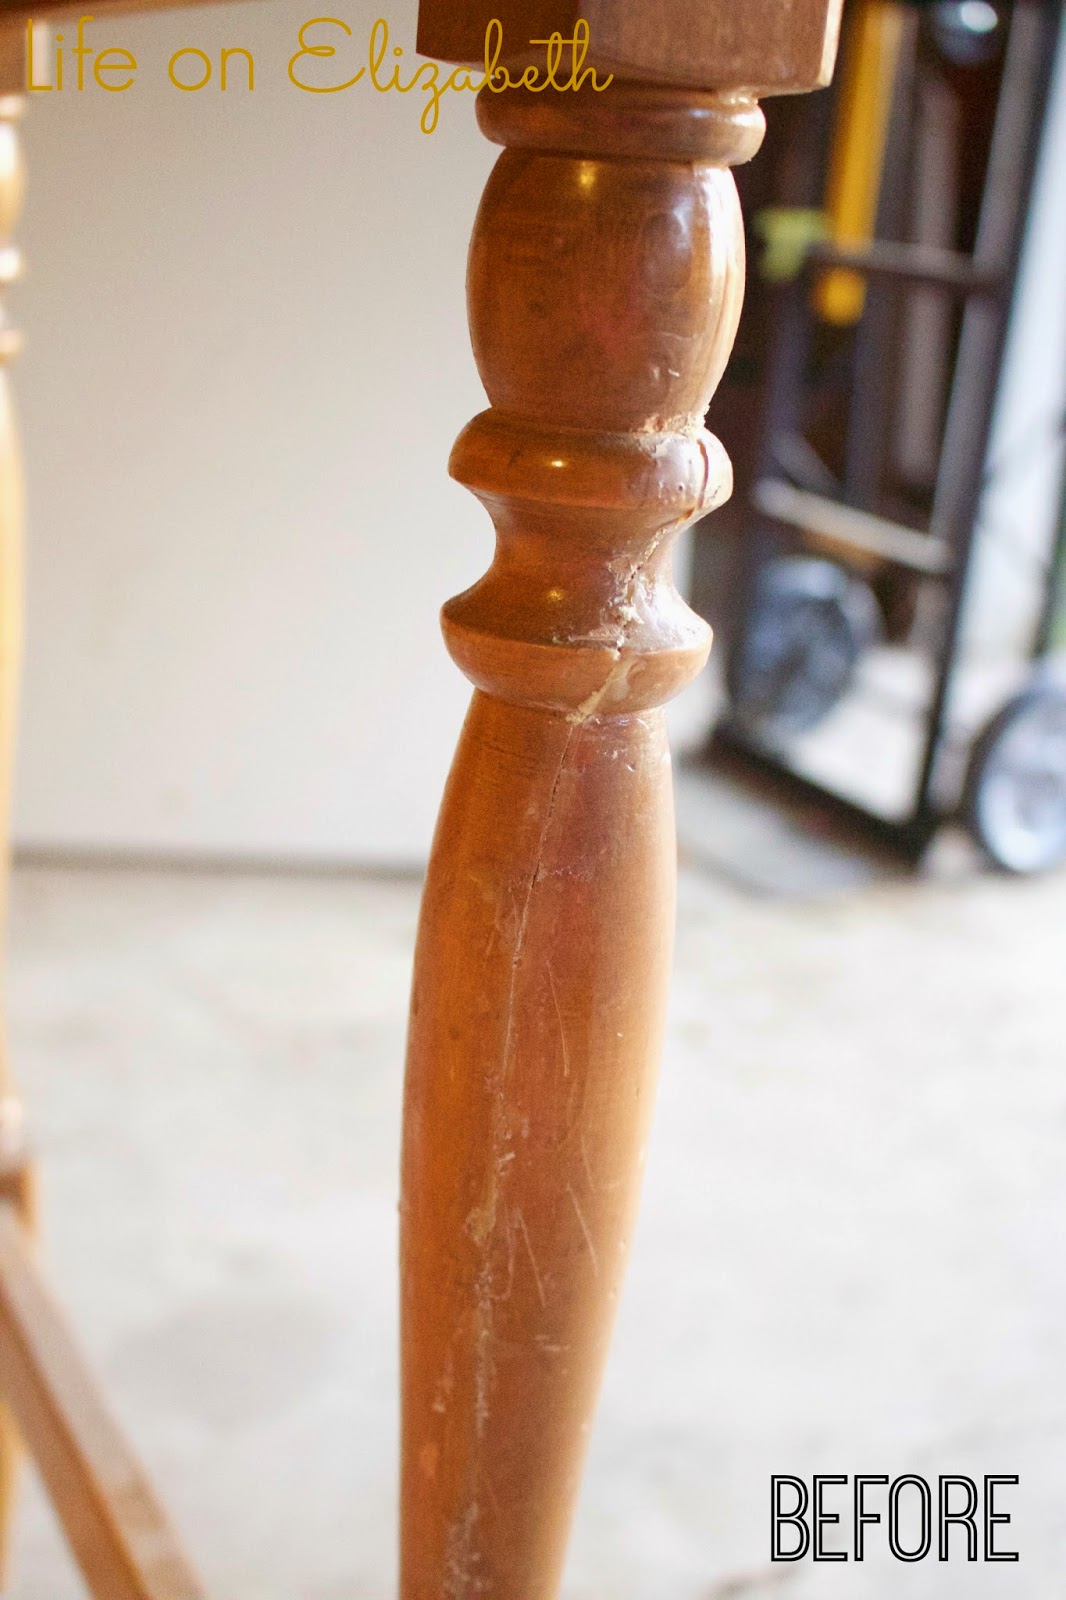
The desk was in pretty rough shape.  The wood veneer on one side of the desk was peeling at the base and one of the legs was obviously broken at one time and someone had slapped some glue on it and called it a day.  She also had a missing nail-in slider so every time I touched the desk, it would wobble like it was doing it's own lil' dance.  


To start this project, I wanted to fix the peeling veneer.  I tried gluing the layers back on using wood glue, but once I tried to sand the veneer to even out the surface, the layers just lifted again.  It was super frustrating.  I mean, I had waited 2 whole days for the wood glue to completely dry and within a matter of a few seconds of sanding the veneer lifted?  The Hulk inside me came out and I decided to just rip the strips of peeling veneer off the desk.  I then used wood filler and filled in any gaps and prayed that once it dried, I could sand it and everything would be even and smooth.  Well guess what?  It worked!  So after waiting 24 hours and sanding the side of my table, this is what it looked like:


Spiffy right?  Ok, well I would understand if you're thinking 'No, not spiffy.  Ugly, actually', but you just wait for the good part m'kay?

Next, I wanted to even out the surface on the legs of my table.  There were globs of dried glue and an obvious gap from where the leg had previously been broken.  I sanded the glue off the legs to smooth it out, used wood filler again to fix any obvious gaps, and then sanded again to smooth out the wood filler.  Wood filler was definitely my friend on this project.
    

To fix the wobbly-ness, I just popped off the old nail-on sliders and nailed in new ones I got from my local hardware store. Easy peasy!  

After fixing my desk to make sure it was solid and sturdier than when I got it, I cleaned and painted the desk following the steps I used in my side table makeover.  I topped the desk off with a piece of plexiglass I had cut down to size at Lowes to protect the tabletop and rub n' buffed the hardware in gold.  This is what the desk looks like now:


Not bad for $27 spent right?  Considering that this desk was a gift and I used supplies and materials I already had, I only had to spend money on the plexiglass! Woot Woot!  Have you checked out your local ReStore?  When I first read about ReStore on Young House Love, I thought it was just an East Coast thing, but to my surprise there are actually quite a few sprinkled all over California.  ReStore is like my little secret source for old furniture.  What places do you usually hit up for old pieces?


This post is linked up to:

 DIY Show Off Link Party

[Share to Pinterest]

Thursday, January 15, 2015

Ikea Drawer Makeover

Lately, I've been trying to put my office together so that it looks less like a college student's study cave and more like a grown-up's work space.  I am almost there...and you bet I'm going to show you my before and after shots!  But today, I want to show you a quick before and after of a set of Ikea drawers that I repainted.

I got this set of Ikea drawers about 8 or 9 years ago to help me keep my desk organized.


I never painted the set of drawers and I never really tried to personalize it either (aside from the random band stickers I had stuck on the sides).  A few months ago,  I started using the drawers to organize my planner supplies and accessories so I wanted to paint it a bright and fun color!


I used Valspar's Coral Reef.  The color of the paint is actually a little deeper than the picture shown above, but I love it!  The color is the perfect pop of color I was looking for and it complements the color of my gold book shelf.  This was such a quick and easy makeover!


[Share to Pinterest]

Sunday, December 28, 2014

My Naked Restroom Window

I hope everyone had a great Christmas!  I hope you had a day off from work and a chance to spend time with your family and friends!

Last week, I showed you how I installed shelves in my restroom for more storage.  Today, I want to show you the before and after of my restroom window.  It's nothing major, really.  It's just that my window was naked..and had nipples.  I bet you don't hear or read that sentence everyday do you?  Well, this is what I mean:


I didn't have any blinds because I thought the frosted glass gave me enough privacy to hide the details of bathroom behavior from my neighbors or any other looky-loos.  I was wrong.  There was one day this Fall when I decided to take "before" shots of my restroom to mark the end of the first part of my bathroom makeover and the start of my second phase.  While looking back at those pictures a couple of weeks ago, I noticed this:


Sorry for the very,very yellow picture!  I had to turn my hallway light off to show you guys a better picture through my window.  Still working on being an average photographer!
I can see the fence between the side of my house and my neighbors driveway!  That would mean that if I were standing outside I could also see what was on the inside, right?  I went outside to test my theory and what do you know?  I could see the the outlines of everything in my restroom!  I mean, don't get me wrong, I'm all about being a free spirit and being happy in your own skin, but I'm not really comfortable with my neighbors seeing my silhouette every time I use the restroom, especially when getting out of the shower.  I quickly fixed the problem by adding blinds I purchased from my local hardware store.

Another issue I had with my window area was that there were 2 old posts attached to the wall from the old towel rod.  I didn't realize what these little nipple-looking things were when I first painted the restroom so I just painted over them last summer.


Yep, I saw 2 small things sticking out of my wall, and I just ignored them for the sake of getting 'er done.  I hang my head in shame.  I really do.  Anyways, back to the towel rod posts.  This is what it looked like when I popped those nips out of the wall by force with a screw driver and hammer.


After some spackling and paint, this is what the restroom window looks like for now!


Now, my neighbors can't see through my bathroom window!  Yay!

This restroom remodel has happened in many tiny phases.  I constantly feel like I need time to figure out what I want this restroom to look like while working with what I've got.  Do you remodel in phases or do you do it in 1 sweep?
[Share to Pinterest]

Saturday, December 20, 2014

Pinterest Did it Again! (DIY Rustic Bathroom Shelves)

Lately, I've been trying to organize my main bathroom and make it pretty for myself and my guests.  When I first got my house, I knew I had to work on the main bathroom immediately and make sure it was useable because it was the only bathroom with a shower.  I had the contractors re-tile the bathroom floor and the shower.  I re-painted the cabinets and replaced the light fixtures, but that was it.  I neglected to add any decor or personal touches to the bathroom since moving in.  Now that most of my main living quarters have been furnished, I wanted to bring my attention back to the bathroom.  After all, it's the space my guests are most likely to see (aside from my living room and kitchen, of course).

This is what the entrance of my main bathroom looked like:


I got the Ikea cart a couple of months ago to help me with my restroom organization...HAHA, but as you can see, there is a lot of vertical space I wasn't using.  I needed shelves!  

I went on Pinterest and found a lot of different pictures for inspiration, but I ultimately chose to make shelves like the ones created by Craftsman Drive & Liz Marie Blog.  The project was actually very simple and would be a good starter weekend project if you were looking to add more shelving to any part of your house.  

These are the supplies I used:


I got all of my supplies from Home Depot, but I'm 99.999% sure all of these supplies are available at any big box hardware store.

Sanding block
Shelf Brackets
1x8" wood (cut down to 24" pieces)
Minwax Wood Finish in Espresso
#6 3/4" screws
Polycrylic
2 Foam Brushes

I started by sanding the edges of the shelves with a sanding block.  I didn't want any obviously sharp edges.  I wanted these shelves to look more rustic and slightly used!  Then, I used a foam brush to apply the stain in small sections and made sure to quickly wipe off any excess stain so that I would have an even finish.  I let the shelves dry and sit for an hour, then I applied a second coat.  I let the second coat dry overnight.


While the stain was drying, I spray painted my shelf brackets a darker gray color and let them dry overnight.

The next day, I applied Minwax Polycrylic to protect my surface and seal everything in.


I let the protective finish dry overnight.

The installation process for these shelves was actually the trickiest.  Since I was installing 2 rows of shelves, I wanted the brackets to perfectly line up with one another but also be evenly spaced out.  I figured the easiest way to do this was do lightly draw 2 evenly spaced vertical lines using my level.  This way I would have a guide for where my shelf brackets should be installed.  I also made sure to draw 2 horizontal lines 16 inches apart to mark my shelf placement.

After attaching the brackets, I attached the shelves to the brackets using 3/4" screws.  I used a damp cloth to wipe off any visible pencil marks.  That's it!


These shelves were so easy!  If you are looking to add some simple, rustic shelves to your home, I definitely recommend trying this.  The best part?  The entire project cost me less than $20!


[Share to Pinterest]

Friday, November 28, 2014

Dining Room Hutch Before & After

I finally finished painting my hutch!  Come on and say it with me...Hip Hip Hooray!  Hip Hip Hooray!!


This hutch was a hand-me-down from the same friend who gave me this side table:


I madeover the side table back in April, but held off on starting the hutch because the thought of sanding and prepping a piece this large was just too overwhelming for me.  After re-painting my vanity with Annie Sloan Chalk Paint and seeing how easy the process was, I knew I wanted to re-do my hutch using Chalk Paint too!

This is what the hutch looked like before I put any paint on it:


I don't have a "before" picture of the top piece of the hutch, but you basically get the idea of how dark the wood was.  Overall, the piece was in pretty good condition.  There were only a few dings on the edges of the hutch, but that's to be expected for a piece that's over 20 years old!

Before I applied any paint, I made sure to remove as much of the hardware as I could.  I used goo gone to remove any sticky residue, then wiped down the hutch with a 1:1 alcohol:water mixture to remove any dust and residual dirt.

I started painting in the garage, but when it started raining, we moved the piece into the house and I painted the hutch in my dining room.  If you have ever used Annie Sloan Chalk Paint before, you would know that it is a water-based paint and it doesn't have the typical "paint smell" you would expect from latex paints.

This is a picture of the hutch in progress:


3 coats of paint and 2 coats of wax later...


Here's a close up of the distressing details on the hutch:


The handles were originally more of a brass-y finish, but I dry-brushed Rub 'n Buff in Gold Leaf to get the finish that you see in the pictures above.

Here are some more shots:


I know, I know...I hate my ceiling fan too, but this room is a work in progress...

And just because I started decorating my Christmas tree, I wanted to include those pictures too...you know, just for funsies!


Isn't she gorgeous?  I love this hutch to pieces and, again, I am so thankful to my friend Ben and his family for thinking of me when they wanted to get rid of their hutch and side table.  I feel like this piece adds so much character to an otherwise bare dining room!  Let me know what you think!


This post is linked up to:  A Bowl Full of Lemons Blog, One Project at a Time: 12/2/2014
[Share to Pinterest]

Saturday, November 1, 2014

How to Update an Old Vanity!

Hey guys!  Do you want to see how I turned this:


...into ...


this?

I recently bought some Annie Sloan chalk paint in Old White for my dining room hutch and was inspired to makeover my vanity because the painting and waxing process is so easy for chalk paint!  With some chalk paint, a piece of glass, and a new mirror, I was able to completely transform my vanity so that it better suites my current decor and brightens up my office/ makeup room.

The makeover process was actually pretty quick and simple.  I started by clearing off the surface of my vanity and emptying out both drawers.  


As you can see, any kind of skin-colored powder foundation is extra-visible on black surfaces, which is another reason why I wanted to paint this sucker!

I then wiped down the entire vanity, including its legs, with some all-purpose cleaner.  When re-painting any piece of furniture, you want to make sure that your surfaces are clean and free of any dust or dirt.  You want to make sure the paint can "stick" to the surface you're painting.


BAM!  Look at what a little elbow grease and actual cleaning can do!  I could have stopped here and kept on using my vanity as is, but this is a post about a makeover, not cleaning.  Silly!

At this point, I screwed the knobs off of each drawer and started painting with the chalk paint.  No sanding or priming or stripping needed!...Yeah, do you hear that?  That's the sound of angels singing. Singing because Annie Sloan chalk paint is...AMAZING!

This is what the piece looked like after 1 coat of paint:


The coverage was pretty good, but I was a little nervous.  The paint is a thicker consistency and I was afraid that after my second coat, I would still have a bunch of streaky patches.  I wasn't sure why I was nervous.  I mean, nearly everyone who has used Annie Sloan chalk paint has raved about it.  This stuff is supposed to be awesome, right?  So I waited about 2 hours and applied my next coat.

This is what the vanity looked like after the 2nd coat:


The finish was opaque and there was no need for me to paint on another coat.  I was so excited, but nervous at the same time.  Is that all?  Can it really be this easy?

I let the vanity sit overnight just to make sure all layers of paint were dry.  Then I started lightly distressing areas of the vanity where you would normally see signs of wear and tear.  Annie Sloan chalk paint is described as a decorative type of paint that is perfect for distressing and creating that shabby-chic, antique-y look.  


I lightly sanded the edges of the vanity with a 120-grit sanding block to get a nice worn-out look.  I could have gone wild with sanding, but decided to be conservative and keep it to a minimum.  

After sanding and wiping down the surface of the vanity to remove any dust, I applied Annie Sloan Soft Wax in Clear.  I learned that a very teensy, tiny amount of wax goes a loooonggg way.  I used a paint brush to apply my wax then wiped off any excess.  The wipe-off process was the trickiest for me.  I started with regular ol' kitchen paper towels, but they didn't seem to absorb very much of the wax and the paper towels tore to pieces too quickly.  Then, I tried tearing up an old white t-shirt to wipe the wax off, but that sucker had so much lint on it that I started to see little pieces of lint embedded in my wax!  Aggghhh! This is when panic and frustration started to set in.  Did I just ruin my vanity?  Do I have to start over?  Nope.  Like always, I calmed down and figured it out.  My White Rags Paper Cloths by Tool Box Brand were the perfect consistency and had great durability.  There was also zero to no lint on these paper cloths so they were perfect!

I let the wax cure for 3 weeks and then had a piece of glass cut down to size at my local hardware store for about $13.99.  I bought the mirror on a HomeGoods run and the rest is history!


Please let me know what you think of this before and after!  This project is very budget-friendly and totally do-able.  You should try it!...I mean, if you want to, that is.
[Share to Pinterest]