Sunday, February 23, 2014

The Best Nail Polish for a DIY-er

Before I cared about the state of my home and what it looks like, I was obsessed infatuated with beauty products (makeup and nail polish).  Needless to say, I tried all kinds of brands of nail polish (Zoya, OPI, Sally Hansen, Deborah Lippmann, Butter London, Essie, Revlon, China Glaze...).  During college and grad school, these polishes worked fine and I never had a real problem with chipping.  However, it wasn't until I started working at my current job that I noticed some brands chip more easily than others.  Then, when I started working on my house last Fall, I really noticed that most brands I used didn't last more than 2-3 days.

I was nail polish-less (I know that's not a word) for a loooong time until I found these....


They are the Formula X for Sephora line.  They are awesome!  

I first got this color as a 100-point perk from Sephora:


It's only a small sample-sized bottle in the color Perfection, but that's all it took.  I was hooked and bought 4 other colors a few days later.  

Tornado/Perfection/Thrilling

Bombshell/Chaotic

Bombshell and Chaotic are Xplosives Top Coats and they give a cool paint-splatter effect on the nails, but I rarely use them because they are a pain to remove.  The plain polishes are as easy to remove as any other nail polish brand, but they apply evenly and I have not had a problem with streaking with any of the colors I own. 

I know this all sounds too good to be true so let me show you what my nails look like after 5 days of unpacking my office, installing a Rubbermaid closet system, and spray painting (in addition to doing daily chores).  


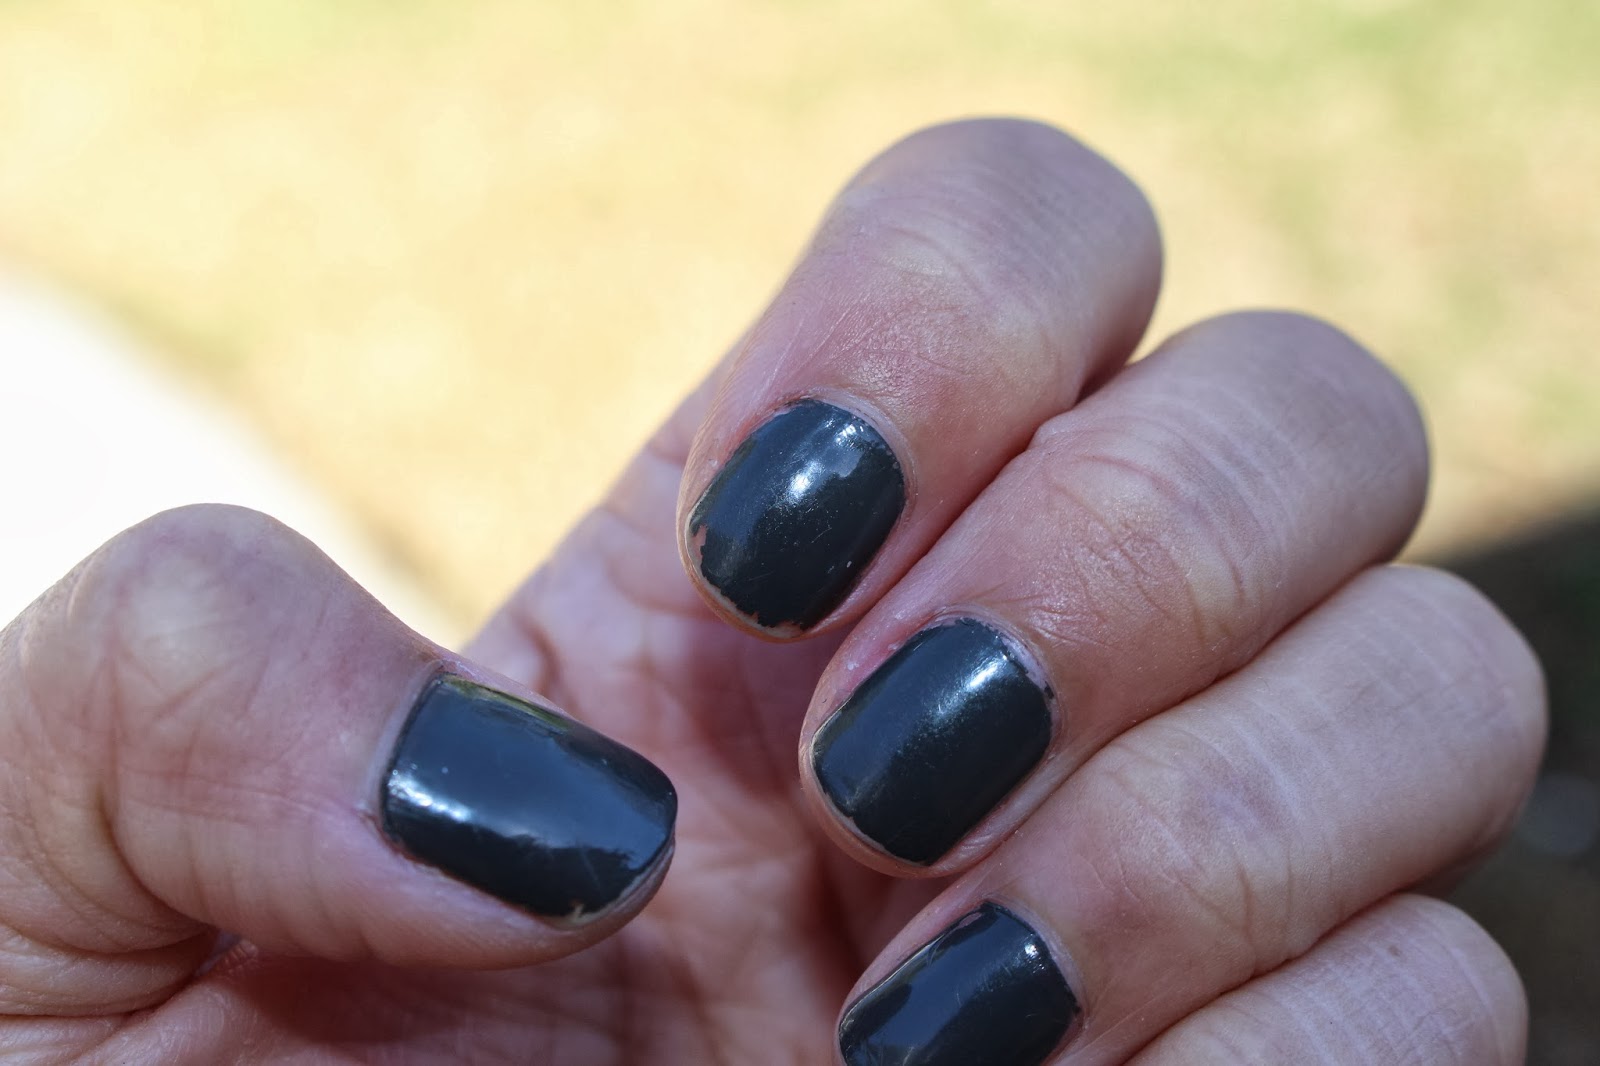
There are signs of minor wear at the tips, but there aren't any huge chunks of nail polish missing yet. For my standards, my nails are still presentable. This, to me, is impressive.  A top coat isn't necessary, but I've always used Sally Hansen's Insta-Dri Anti-Chip Top Coat with all of my polish.  These polishes aren't indestructible, but they are the best polishes I've used so far.

The regular polishes are $10.50 and the special effects polishes are $12.50.  These polishes are a little more pricey than other brands I've tried, but the pay off is worth it to me.  The price is also a reason why I don't have way more than 5 colors.  But if you're curious, I think you should venture into a store and try these polishes out.  They have testers for every color in the stores.  

I know this was a bit of a random post, but I was getting frustrated with having to compromise beauty for the sake of home improvement.  Why can't I hang a door, install trim, and close a doorway AND still have pretty nails?  Let me know if you would like more reviews of beauty-related products I've tried!
[Share to Pinterest]

Saturday, February 22, 2014

Budget Buys Part Deux

I was out strolling through Target and Office Depot today and I found a couple of good things!

1.  At Target, I trolled the end caps around the home decor section and came upon another mirror I could incorporate into my gallery wall.


Yes, that's right folks.  This baby was $29.99 and I got it for $8.98!  What?! I know, crazy right?

2.  The next deal I landed is even better.  The sale for this deal ends today (2/22) though, so if you're interested in getting a label maker act fast!  Also, be aware that the sale might only be local or in certain regions where Office Depots are located so check your local ads online before wasting a trip.

It's a Brother P-Touch PT-D200.
$10.00.  This label maker was $29.99 off the original price of $39.99.  Need I say more? (Actually, I was so excited after buying this, I called my best friend and basically gave her a play by play of how this label maker came home with me.  True story.)

3.  Lastly, I'm finally organizing my office/ guest room and decided to also get some velcro straps to help manage all the electrical and technological cords I've accumulated in the last ten years.  I grabbed these and they were all less than $5 each.  


These straps weren't on sale, but they were less expensive than I anticipated so that was a plus!

There you go folks!  Everybody loves a good deal and I like sharing good deals.  Let me know if you find any awesome home decor deals or if you have any tips for finding sweet deals.
[Share to Pinterest]

Thursday, February 20, 2014

Pretty Pretty Prints

I've been on the hunt for some wall art for my makeup room, kitchen, restroom, and bedroom.  So basically, every room in my home.  I made a couple of pinterest-inspired canvas pieces, but I wanted some pieces that were unique and weren't made by me.  These are some prints I want to add to my collection in the very near future:

I spotted the first set of prints over at The Beauty Department when they featured different kinds of beauty-related prints in this post.


Rifle Paper Co.

Next, I went over to Etsy and found these:

Glitz Papier


The Digital Studio

I was delightfully surprised to find that Minted also carried prints.  I knew they sold cute stationary, but had no idea they sold prints made by different artists.

Minted

Cute, right? Where do you guys get your wall art from?
[Share to Pinterest]

Wednesday, February 19, 2014

Tips on Tearing Down a Built-In Closet

I'm on vacation from my 9-5 this week!  YAY!!!  I decided to start vacation by tearing out the built-in closet in my office/ guest room.


As you can see, there was a lot of debris and trash in this closet that I didn't want to touch.  There were hats and beanies left from the previous owners.  There was a dirty towel on the floor that was also left here.  Also, there were pieces of plaster (?) left here from my last contractor who had to patch a huge hole in the closet because his team accidentally knocked a hole in the closet when they demo-ed the restroom on the other side of the wall...oops.

So here are my tips for attacking a small project like this:

  1. If you can, ask someone to help.  I could have done it all by my lonesome self, but another set of hands to help with the long pieces of MDF or wood is always good.
  2. Safety first!  Wear goggles, gloves, and SHOES when you are tearing something down.  You wouldn't want your little piggies on your little footsies to be smashed to smithereens would you?!
  3. Assess the situation.  This sounds like a no brainer, but you want to look at the closet and find were the screws were placed.  Can the shelves be removed without screws?  Are the hanging rods screwed into the unit?
  4. Remove the small pieces first and work slow.  You don't want to attack the closet and unscrew the big pieces first because you'll be left with one big piece of MDF to carry.
  5. Designate a spot for all the trash to go so that the aftermath is contained.  I personally coordinated this closet teardown with the arrival of my demo guys who were tearing down my half bath.
  6. Having the right tools help too.  This unit was attached using screws so I made sure I had my power drill.
  7. Clean as you go.  When there are nails and refinished floors involved, you want to make sure that your work area is clean so that you aren't stepping on nails and you aren't tracking dirt throughout your home.
For me, I started by removing the trash.  Then I unscrewed the shelves and hanging rods.  I was left with the long vertical planks and the top shelf.  I needed an extra set of hands to help me hold the vertical planks while I unscrewed them from the top of the closet.  All in all, the teardown took about 30 minutes.  


The closet is still disgusting and the shoe-string hanging from the light fixture gives me the heebie jeebies, but it's still a work in progress.  Today, I plan to fix my contractors patch job then I'll paint and install a new closet system.  I'll be sure to show you the after pics very soon!

[Share to Pinterest]

Sunday, February 16, 2014

Budget Buys

Here are some budget-friendly purchases I've made for my home this week!

1.  I bought a pouf!  You know, one of those cylindrical, soft accent pieces you can use as a makeshift seat, footrest, or just decor?  I specifically got this one from Target.  The original price listed at Target.com is $54.99, but there were 2 that I saw on clearance in stores for $38.48 each.  

Source


2.  I started a gallery wall in my living room and found wall frames on sale at Hobby Lobby and Michaels for 40% off.  I want all my frames on this wall to have a natural wood feel, but still be different from one another.  I want to add another row of pictures onto this wall, but I'm actually having a pretty tough time finding wall frames with the right look, at the right price.  

I don't really own a horse (see 2nd row)...

3.  A set of 3 starburst mirrors from Target's Threshold Line.  I scattered these mirrors through my growing gallery wall.  The original price was $24.99 (which is still the price at Target.com), but the mirrors are actually on clearance at both stores in my town.  I was able to score this set for $17.99!  Woot Woot!

Source


I just love being able to take advantage of great deals, especially when it comes to home decor items or furniture.  My goal is to have my house ballin' on a budget.  Have you found any good deals?  If so, let me know!
[Share to Pinterest]

Thursday, February 13, 2014

They Call Me Dr. Green Thumb: How to Plant Succulents

 Well...not really.  They actually call me Wendy, but today I felt like Mrs. Green Thumb.  Let me tell you why! So, I went to Lowes today to pick up some spray paint for my other lamp re-vamp (see how I made that rhyme)  and I came across succulents in the gardening section.  I've heard that they are very sturdy plants so I decided to pick them up!  I also picked up a wide glass bowl and some river rock from Hobby Lobby.


First, I lined the bottom of the bowl with a layer of rocks to improve water drainage in hopes of preventing root rot.  I learned today that succulents need VERY little water during this season and root rot happens very quickly when succulents are over-watered.  Then, I poured a thick layer of potting mix (meant for drier climate plants) over the stone and planted the succulents in an alternating arrangement.


This was an easy, fairly inexpensive project. Here are some pointers (that I've acquired after planting these succulents) that you would probably want to keep in mind if you wanted to take this project on as well:
  1. It is best to get a terra cotta type pot or a pot with holes on the bottom to allow for water drainage  (according to several succulent blogs I've found, glass is probably one of the worst containers for succulents...hindsight is 20/20)
  2. Don't water often, especially during the winter time.  Allow for the soil to dry before watering again.
  3. Use potting mix that is meant for dry climate plants like cactus
  4. Succulents like light, but not too much light?  (not really sure what too much light means, but I guess I'll find out the next few weeks)
  5. Succulents & Sunshine has a lot of good information about caring for succulents.  I didn't think to look up "how to care for succulents" until after planting them..DOH!
For most of the time, these succulents will be sitting on my kitchen counter by the window where a lot of sunlight comes through during the day.  However, I can see myself moving this bowl to my coffee table or dining table when I want to use it as a centerpiece or a part of my living room decor.  I love that succulents are so versatile and look at home wherever they are sitting in my home.
[Share to Pinterest]

Monday, February 3, 2014

How to Update an Old Lamp


Do you have any items at home you use on a daily basis, but feel like they look dated or don't fit into your current home decor?  I do!  I have several lamps I've collected over the last 10 years and one of them just doesn't look like it has any personality.

Here she is:
Excuse the furry creature in the background.  
Don't get me wrong, there's nothing really wrong with the lamp.  It works perfectly fine and I love the simple white lampshade, but I feel like the base needs a little oomph!  So I did what any DIY-er would do.  I went on google and typed in "colorful lamps" in the search engine and came upon this.  So I was inspired to change the color of my lamp base with spray paint!

I removed the lamp shade and gave the lamp a good wipe down to remove any dust and handprints that   have collected over the last few months.  Then, I taped off the base with painter's tape and spray painted the upper part of the lamp with Valspar's Color Radiance, Advanced Color in Mellow Spring (Gloss).  

Also, please excuse the damp, dirty ground...it rained last night and continued to rain an hour after I spray painted this.

I removed the green painter's tape and let the lamp dry for about 24 hours.  I then taped off and covered the upper part of the lamp with construction paper so that only the base of the lamp was exposed.  If you are going try this project at home, please make sure your spray paint is dry before taping it off.  The last step was to spray paint the base of the lamp with Design Master's Premium Metal spray paint in Gold Metal (found at Michaels).  After taking all the tape off and sticking the lamp shade back on, this is what I ended up with: 

Voila!
Isn't she a beauty?  I love my lamp all over again.  I love that the color is a soft, but a bright blue and the gold accent at the base of the lamp is just lovely!  I know, I know I've said LOVE soo many times in the last few lines, but I really do love it!

So if you find any lamps that you are growing bored of, you can do this at home too!  It only took about 2 days and that was only because I had to wait for the spray paint to dry.  The actual cleaning, taping off, and spray painting took about 2 hours at the most (for both top and bottom sections).  The result of the project was so rewarding, I also want to try spray painting a desk lamp I've had since my freshman year of college.  Stay tuned and I'll keep you posted on the results!

[Share to Pinterest]

Sunday, February 2, 2014

Mini Fireplace Facelift

It's winter in California and it was 59 degrees today!  I can't complain about our weather, but the lack of snow or extreme cold gives me no reason to use my fireplace.  This is a problem.  Why?  Well, you see...I have neglected to give my fireplace any love and attention because I never use it.  This is a problem because the fireplace is the focal point of my living room.  With the way the seating is arranged and where the TV is positioned, you can't help but look at my fireplace when you come into my home.

Remember this picture?  If not, you can read my last post (then come back here, of course):


While editing my last post, I noticed that my fireplace looked really...old and sad.  The gold metal accent above the fireplace stood out (in a bad way) and made the space feel dated.  There were also pieces of burnt wood and ashes from papers the previous owners had burned before leaving the house (I know this sounds kind of creepy, but I forgot that these items were in there).  This space needed a mini makeover!

After removing the debris and cleaning the hearth with Mrs. Meyers All Purpose Cleaner, I spray painted the gold metal accent with Rust-Oleum Metallic Satin Spray in Oil-Rubbed Bronze to match all of the door knobs in my home.  Because I never light any fires, I figured I would fill my fireplace with white or cream-colored pillar candles to fill the space and give it some character.

I know this has been done before (see Pinterest), but I thought it was such a quick and inexpensive way to give this space some light

A close up

I purchased the candles from HomeGoods. The prices of the candles ranged from $4.99-17.99, with most of them being less than $10.  I originally wanted to DIY the pillar candles, but after researching the cost of supplies I knew buying pre-made candles from HomeGoods was the way to go.

The gold strip is no longer here to taunt me and the candles fill up the fireplace very well.  The space no longer looks like a neglected, dark abyss.  I love that I was able to quickly update my fireplace with less than $100 and within a couple of hours.


In person, the fireplace feels a lot more cozy and romantic than it looks in these pictures (especially when all the candles are lit).  For now, I'm really happy with what I've done so far.  Eventually, I want to add woven baskets or vases to the hearth to make the space more inviting.  Stay tuned to see how I continue to decorate the focal point of my living room!    
[Share to Pinterest]