Showing posts with label furniture makeover. Show all posts

Saturday, February 21, 2015

ReStore Desk Makeover for Less than $30

If you guys ever saw the pictures of my office when I first moved in, then I will consider the pictures in this post my redemption.  I recently madeover a small desk my boyfriend bought me from ReStore.     I wanted a project desk.  I wanted something old, sturdy, with cool detailing.  I have to say the desk I got is exactly what I had in mind.


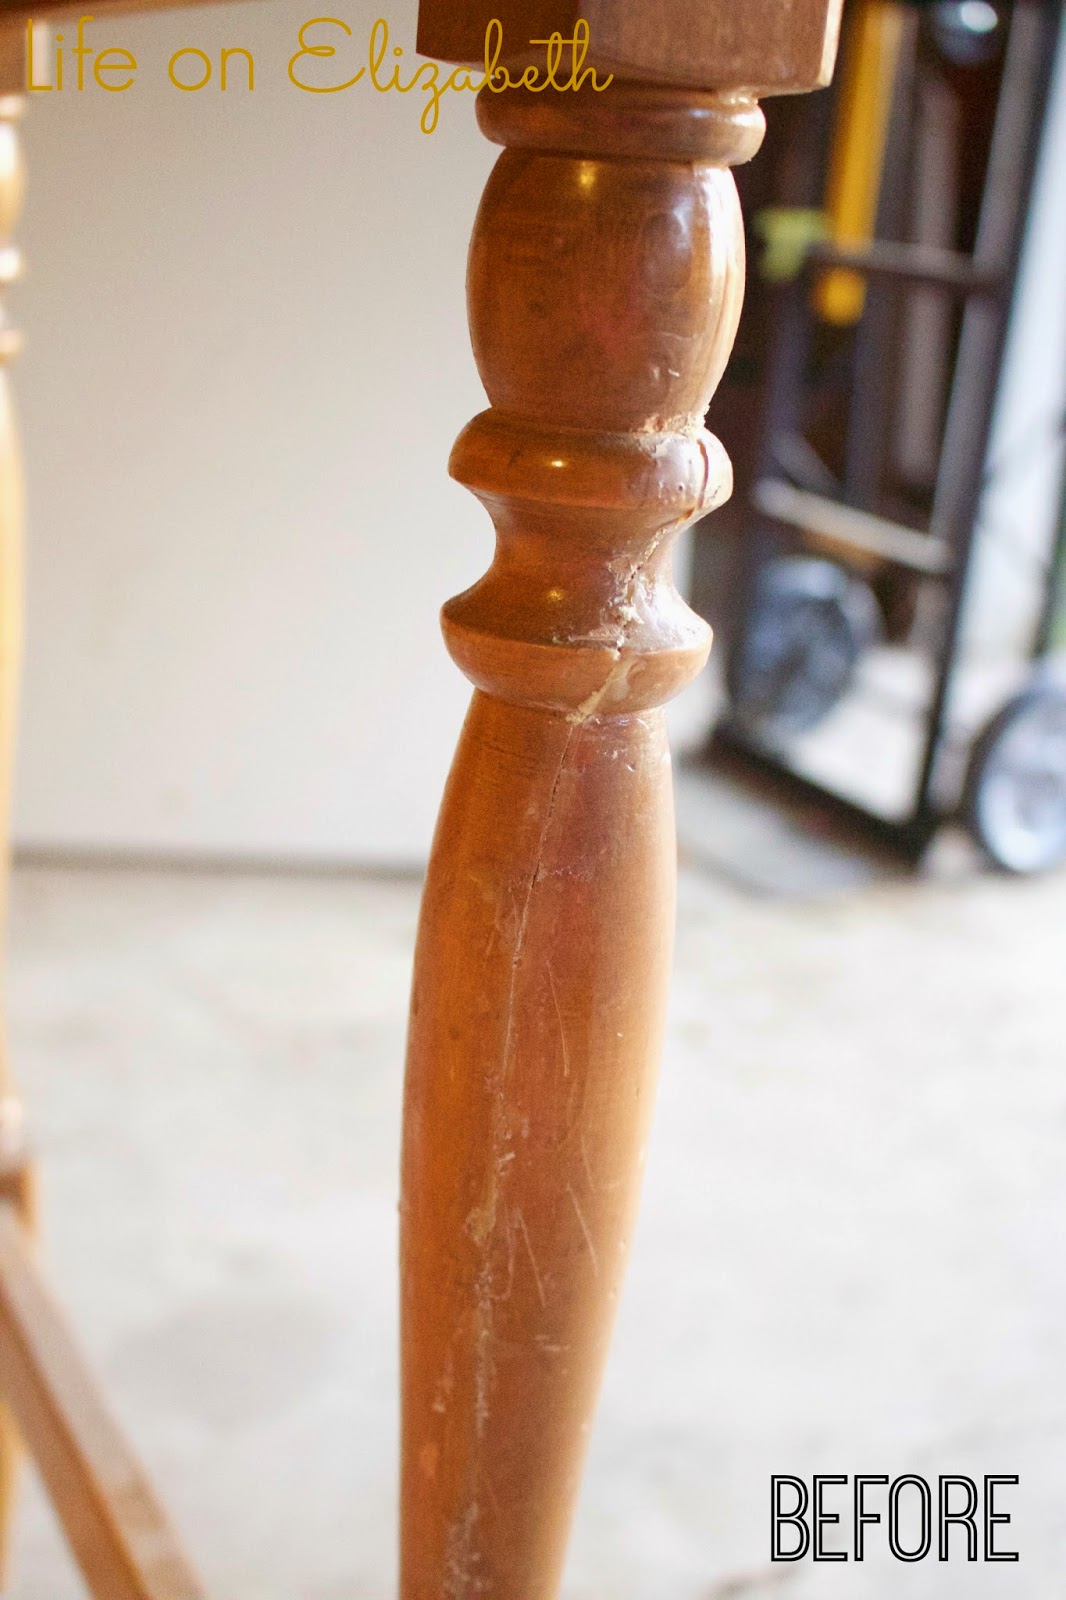
The desk was in pretty rough shape.  The wood veneer on one side of the desk was peeling at the base and one of the legs was obviously broken at one time and someone had slapped some glue on it and called it a day.  She also had a missing nail-in slider so every time I touched the desk, it would wobble like it was doing it's own lil' dance.  


To start this project, I wanted to fix the peeling veneer.  I tried gluing the layers back on using wood glue, but once I tried to sand the veneer to even out the surface, the layers just lifted again.  It was super frustrating.  I mean, I had waited 2 whole days for the wood glue to completely dry and within a matter of a few seconds of sanding the veneer lifted?  The Hulk inside me came out and I decided to just rip the strips of peeling veneer off the desk.  I then used wood filler and filled in any gaps and prayed that once it dried, I could sand it and everything would be even and smooth.  Well guess what?  It worked!  So after waiting 24 hours and sanding the side of my table, this is what it looked like:


Spiffy right?  Ok, well I would understand if you're thinking 'No, not spiffy.  Ugly, actually', but you just wait for the good part m'kay?

Next, I wanted to even out the surface on the legs of my table.  There were globs of dried glue and an obvious gap from where the leg had previously been broken.  I sanded the glue off the legs to smooth it out, used wood filler again to fix any obvious gaps, and then sanded again to smooth out the wood filler.  Wood filler was definitely my friend on this project.
    

To fix the wobbly-ness, I just popped off the old nail-on sliders and nailed in new ones I got from my local hardware store. Easy peasy!  

After fixing my desk to make sure it was solid and sturdier than when I got it, I cleaned and painted the desk following the steps I used in my side table makeover.  I topped the desk off with a piece of plexiglass I had cut down to size at Lowes to protect the tabletop and rub n' buffed the hardware in gold.  This is what the desk looks like now:


Not bad for $27 spent right?  Considering that this desk was a gift and I used supplies and materials I already had, I only had to spend money on the plexiglass! Woot Woot!  Have you checked out your local ReStore?  When I first read about ReStore on Young House Love, I thought it was just an East Coast thing, but to my surprise there are actually quite a few sprinkled all over California.  ReStore is like my little secret source for old furniture.  What places do you usually hit up for old pieces?


This post is linked up to:

 DIY Show Off Link Party

[Share to Pinterest]

Thursday, January 15, 2015

Ikea Drawer Makeover

Lately, I've been trying to put my office together so that it looks less like a college student's study cave and more like a grown-up's work space.  I am almost there...and you bet I'm going to show you my before and after shots!  But today, I want to show you a quick before and after of a set of Ikea drawers that I repainted.

I got this set of Ikea drawers about 8 or 9 years ago to help me keep my desk organized.


I never painted the set of drawers and I never really tried to personalize it either (aside from the random band stickers I had stuck on the sides).  A few months ago,  I started using the drawers to organize my planner supplies and accessories so I wanted to paint it a bright and fun color!


I used Valspar's Coral Reef.  The color of the paint is actually a little deeper than the picture shown above, but I love it!  The color is the perfect pop of color I was looking for and it complements the color of my gold book shelf.  This was such a quick and easy makeover!


[Share to Pinterest]

Saturday, January 3, 2015

Places to Find Inexpensive Furniture

From the start of my blog, I've showed you several before and afters of furniture I have re-habbed.  Whether you regularly make-over furniture or you would like to start doing so this year, I wanted to share the list of places I check out for inexpensive furniture!


Habitat for Humanity ReStores
ReStores are great places to look for different pieces of furniture, light fixtures, doors, and miscellaneous items.  I like looking here first for old furniture because the proceeds are used to help build homes in the immediate and surrounding communities.  My local ReStore always has cool coffee tables and side tables that are in good condition...if only I had more space...

Craigslist
When I was in college, I regularly bought and sold furniture on Craigslist.  Since finishing college, I have had very little luck, but there are times when I spot decent pieces at great prices.  Craigslist ads also depend on the neighborhoods you live in.  I find that when I search Craigslist in the surrounding cities, there are usually better pieces.  The only hesitation I have for Craigslist is the safety factor.  Please always have a purchase buddy and know the neighborhood.

Friends
Do you have any friends who are moving or just want to get a piece of furniture off their hands?  Don't be shy to accept if they offer and it never hurts to ask how much they want the piece for if they want to get rid of it.  2 of my largest pieces of furniture I have re-done were gifted to me by my friend froms work!

Flea Markets/ Antique Fairs
Flea markets and antique fairs are also great places to look for pieces of furniture.  Many of the weekend markets that I have visited in Central/Northern California have great, inexpensive finds!
[Share to Pinterest]

Friday, November 28, 2014

Dining Room Hutch Before & After

I finally finished painting my hutch!  Come on and say it with me...Hip Hip Hooray!  Hip Hip Hooray!!


This hutch was a hand-me-down from the same friend who gave me this side table:


I madeover the side table back in April, but held off on starting the hutch because the thought of sanding and prepping a piece this large was just too overwhelming for me.  After re-painting my vanity with Annie Sloan Chalk Paint and seeing how easy the process was, I knew I wanted to re-do my hutch using Chalk Paint too!

This is what the hutch looked like before I put any paint on it:


I don't have a "before" picture of the top piece of the hutch, but you basically get the idea of how dark the wood was.  Overall, the piece was in pretty good condition.  There were only a few dings on the edges of the hutch, but that's to be expected for a piece that's over 20 years old!

Before I applied any paint, I made sure to remove as much of the hardware as I could.  I used goo gone to remove any sticky residue, then wiped down the hutch with a 1:1 alcohol:water mixture to remove any dust and residual dirt.

I started painting in the garage, but when it started raining, we moved the piece into the house and I painted the hutch in my dining room.  If you have ever used Annie Sloan Chalk Paint before, you would know that it is a water-based paint and it doesn't have the typical "paint smell" you would expect from latex paints.

This is a picture of the hutch in progress:


3 coats of paint and 2 coats of wax later...


Here's a close up of the distressing details on the hutch:


The handles were originally more of a brass-y finish, but I dry-brushed Rub 'n Buff in Gold Leaf to get the finish that you see in the pictures above.

Here are some more shots:


I know, I know...I hate my ceiling fan too, but this room is a work in progress...

And just because I started decorating my Christmas tree, I wanted to include those pictures too...you know, just for funsies!


Isn't she gorgeous?  I love this hutch to pieces and, again, I am so thankful to my friend Ben and his family for thinking of me when they wanted to get rid of their hutch and side table.  I feel like this piece adds so much character to an otherwise bare dining room!  Let me know what you think!


This post is linked up to:  A Bowl Full of Lemons Blog, One Project at a Time: 12/2/2014
[Share to Pinterest]

Monday, May 26, 2014

Park Bench Makeover: Before & After

I finally finished making over the park bench that was gifted to me by my friend, Melissa.  If you missed my post about prepping a bench for a makeover, go ahead and read about it here.

 Behr Honey Bird (Semi-Gloss) & Rustoleum Soft Iron (Flat)
I painted the park bench a bright yellow and I love how bright and happy the bench looks sitting on my porch.  I was torn between a bright yellow or a watermelon red, but bright yellow won.  I picked yellow because I often see red outdoor furniture on my neighbors' porches and I wanted something that equally stood out, but was slightly different.


The only recommendation I have for painting a park bench (in addition to prepping the piece) is remember to prime the wood before painting it.  This is the one and only time that I've skipped primer and I ended up painting seven (yes, as in 7!!!!) coats to entirely cover the natural wood color underneath.  Otherwise, painting the wood slats was very straightforward and re-assembling my bench alone was a breeze.  I also used used Minwax polycrylic over all the wood slats.

Here's a before and after shot:


Can you believe the difference?

Linked to:  http://diyshowoff.com/category/other/that-diy-party/
[Share to Pinterest]

Sunday, April 27, 2014

How to Paint Furniture: My Side Table Makeover!


I am so grateful to my friend, Ben, and his family for giving me the furniture they no longer needed/wanted in their home.  They recently remodeled their living area and the old furniture they had no longer matched their current decor.  As a result, I was able to get a hutch and side table for $FREE!  I am so thankful to have such nice and thoughtful friends!


This beautiful piece is actually a buffet that I am using as a side table.  Although the cherry finish is beautiful, there were a few scuffs at the base and top of the piece so I decided to paint it.  I know there are many furniture painting tutorials online, but let me put in my 2 cents!

1.  Start by cleaning your piece of furniture the best that you can.  If there are little sticky patches, use a product like Goo Gone to completely remove any residue and then clean with wipes or any type of all-purpose cleaner to remove any grease, dust, dirt.


2.  Remove any "shine" from the piece of furniture so that the primer and paint will "stick".  You can do so by using a chemical de-glosser or just sanding the piece.  I sanded.  Sanding is especially important if you have imperfections on the piece like this:


If you have any imperfections, use sandpaper with a low number grit (coarser) to even out the surface and then use sandpaper with a higher number grit (more fine) to smooth out the surface.

3.  Tape off any places on the piece where paint may land on to protect areas that you don't want to paint.


4.  From what I've read on the blogs, everyone uses a stain blocking primer for stained-wood pieces like mine, so I did.  I used KILZ Premium primer, but I also read that Zinser is a good one too.  The primer helps the paint stick, helps block out the darker wood color, and prevents any stain on the wood from affecting your paint finish.  

5.  I also used Floetrol, which is a paint additive, to keep my paint from drying as quickly as it normally would.  This helps to decrease the appearance of brush strokes and gives me more time to work with my piece.  

6.  Make sure you paint thin layers.  Thick layers will make your final layers of paint look goopy and un-even. If you do end up with any thick layers, let the paint completely dry and sand with a high grit sandpaper.

7.  Remove all hardware and hinges.  I would also remove the drawers if possible.  I couldn't remove my drawers so they often times got in the way when I was trying to paint the areas between them.  I was also worried that I would somehow paint my drawers shut by not removing them, but they didn't.. thank goodness!

8.  Spacing out a project like this through the span of a few days would be ideal.  You want to let your paint completely dry before painting on another coat.  You also want to give yourself time to step away from the piece and give yourself a break so that you aren't rushing through the project towards the end because you have the "I just want to be done with this" feeling.

9.  Use Minwax Polycrylic or any other protective finish if you will be using the piece regularly.  I only recommend Minwas Polycrylic because the blog-o-sphere has said that it doesn't yellow furniture and mine hasn't yellow-ed.  Remember to let your protective finish dry and cure.  Which means leaving it alone for a few days or maybe even a week?

10.   Have fun!  This is YOUR piece and you're putting a lot of work into it.  Who cares if it's not super perfect.  All that matters is that you love it!


This piece took me about a week to finish.  After applying the protective finish, I let my side table sit in my living room (untouched) for 4 days before I started putting ANYTHING on it.  

These are some of the awesome blogs I visited for inspiration and directions:
  1. LiveLoveDIY
  2. Young House Love
  3. DIY on the Cheap
  4. The Frugal Girl
  5. In My Own Style
Happy painting!

Linked to:  DIY Show Off
[Share to Pinterest]