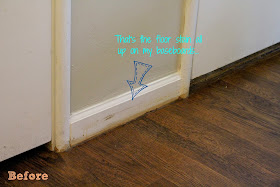
One of the items on the to-do list for my office was painting the baseboards and installing baseboards where needed. When my floor guys came and re-finished my wood floors last fall, they asked if I was going to replace all of my baseboards. In my first-time homeowner's high, I said "yeah, yeah I'll replace it all". So my floor guys went ahead and stained the wood floors without removing or taping off the trim. Needless to say, I ended up with baseboards that looked like this:
Yeah...I didn't realize this is what my baseboards would look like after the floors were finished and I brought it all. upon. myself.
My 2 options were:
- Replace ALL the baseboard in my house, or
- Repaint the existing baseboard
I chose to repaint the baseboards that were already installed. Why? Well, a gallon of ultra white paint is A LOT cheaper than buying baseboards for an entire house and I don't have a miter saw. All the trim I have installed in my house so far, I have used a miter box with a hand-saw. A hand-saw. You know, one of those saws where you have to use your own muscles. I mean, I know I need to workout more, but sawing all those pieces of baseboards by hand with a saw and miter box were not my idea of fun. Yes, I could have invested in this miter saw if I wanted to because I would use it to build things later down the line, but I also thought about all the wasted baseboard that I would have to remove and throw away. So, repaint the baseboards it was!
These are just steps for homes without carpet. I honestly don't have a clue how you would paint baseboards with existing carpet. Sorry.
- Start out by using a dryer sheet to wipe off all the dust and dirt from the baseboards. I would use a cleaning solution or wet wipes if there is a lot of gunk. You want your baseboards as clean and dust free as possible so that you don't end up with little bumps on your baseboard.
- Then, tape off the floor with painters tape and be sure to apply extra pressure on the areas where the tape meets the baseboards.
My tip would be to lay down construction paper, red rosin paper, or Ramboard to protect your floors from drips and splatters. I'll show you why later. - Using the painter's tape as a guide, paint your baseboards. I would start with thin layers. Thick, goopy layers can lead to dripping or a bumpy finish.
- While the paint is still damp, remove the painter's tape at an angle. DON'T wait until the paint is dry to remove the tape because you risk the dried paint coming off with it.
This is what the baseboards look like now:
 |
| Spiffy amiright?! |
Some of you may notice the paint splatters on my wood floors in the after photos. In my next post, I'll show you how I remove these spots! See you soon!


Thanks so much for sharing. I get relavant information from your post.
ReplyDeleteThank you for sharing the knowledge and the tips! It is very helpful and informative. Don’t forget to use elcometer to measure the thickness of the paint to make it easier for you to get the painting job perfectly done. Anyways, would love to see more of your posts.
ReplyDeleteElcometer 500