Thursday, February 26, 2015

How I Repurposed Old Shelves

On a recent visit to see my closest friends and their precious baby boy, I scored 2 shelves my best friend was intending to throw out.  You don't understand the level of excitement I had when she told me I could have them.  I felt like Charlie when he found the golden ticket or Harry when he caught the Golden Snitch!  Really, I did.

This is what the 2 bad boys looked like after I had taken the particle board tops off.


I spray painted the metal parts white and decided to cut some 1x7.25" wood boards to use as the tops of the shelves.  I started to stain the wood boards with Minwax's Weathered Gray, but as soon as the stain dried on all the boards, I realized the color just wasn't me.  The color was too gray and too light...not that the name Weathered Gray is a correct description or anything.  (sarcasm implied)  So as usual, I reverted back to Espresso, my favorite stain color of all time.

Because the shelf brackets were fairly deep, I attached 2 pieces of wood using my kreg jig.


After attaching the boards to the top of the shelves, this is what they looked like.  I used one shelf in my office and the other above my drink station.

Kitchen Shelf
Office Shelf

I love the beautiful detailing on the brackets and the fact that I spent less than $40 repurposing both of them makes them even better!  What do you think?

This post is linked up to:
That’s What Che Said

Saturday, February 21, 2015

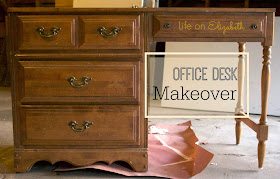
ReStore Desk Makeover for Less than $30

If you guys ever saw the pictures of my office when I first moved in, then I will consider the pictures in this post my redemption.  I recently madeover a small desk my boyfriend bought me from ReStore.     I wanted a project desk.  I wanted something old, sturdy, with cool detailing.  I have to say the desk I got is exactly what I had in mind.


The desk was in pretty rough shape.  The wood veneer on one side of the desk was peeling at the base and one of the legs was obviously broken at one time and someone had slapped some glue on it and called it a day.  She also had a missing nail-in slider so every time I touched the desk, it would wobble like it was doing it's own lil' dance.  


To start this project, I wanted to fix the peeling veneer.  I tried gluing the layers back on using wood glue, but once I tried to sand the veneer to even out the surface, the layers just lifted again.  It was super frustrating.  I mean, I had waited 2 whole days for the wood glue to completely dry and within a matter of a few seconds of sanding the veneer lifted?  The Hulk inside me came out and I decided to just rip the strips of peeling veneer off the desk.  I then used wood filler and filled in any gaps and prayed that once it dried, I could sand it and everything would be even and smooth.  Well guess what?  It worked!  So after waiting 24 hours and sanding the side of my table, this is what it looked like:


Spiffy right?  Ok, well I would understand if you're thinking 'No, not spiffy.  Ugly, actually', but you just wait for the good part m'kay?

Next, I wanted to even out the surface on the legs of my table.  There were globs of dried glue and an obvious gap from where the leg had previously been broken.  I sanded the glue off the legs to smooth it out, used wood filler again to fix any obvious gaps, and then sanded again to smooth out the wood filler.  Wood filler was definitely my friend on this project.
    

To fix the wobbly-ness, I just popped off the old nail-on sliders and nailed in new ones I got from my local hardware store. Easy peasy!  

After fixing my desk to make sure it was solid and sturdier than when I got it, I cleaned and painted the desk following the steps I used in my side table makeover.  I topped the desk off with a piece of plexiglass I had cut down to size at Lowes to protect the tabletop and rub n' buffed the hardware in gold.  This is what the desk looks like now:


Not bad for $27 spent right?  Considering that this desk was a gift and I used supplies and materials I already had, I only had to spend money on the plexiglass! Woot Woot!  Have you checked out your local ReStore?  When I first read about ReStore on Young House Love, I thought it was just an East Coast thing, but to my surprise there are actually quite a few sprinkled all over California.  ReStore is like my little secret source for old furniture.  What places do you usually hit up for old pieces?


This post is linked up to:

 DIY Show Off Link Party

Thursday, February 19, 2015

How to Make a Pinboard

Spring is coming and you know what that means... S-P-R-I-N-G C-L-E-A-N-I-N-G!  In an attempt to tidy-up my office area, I made a pinboard to help me stay organized.  This is how I did it.


Supplies needed:
Cork sheets
Picture frame
Fabric
Staple gun or hot glue gun


Steps:
1.  Use the backing of the picture frame as a guide and measure out the roll of cork to fit the inside of the frame. Because the cork was actually pretty thin, I decided to use 2 layers instead of just 1.  The only gripe I have about the cork that I used is that it is slightly....brittle?  The cork tore very easily while I was cutting it so I would recommend being very careful if you decide to use the same kind I did. (I got my rolls of cork from Hobby Lobby)

2.  Lay the fabric face down.

3.  Lay the cork on top of the fabric.

4.  Lay the backing for the picture frame on top of the cork.

5.  Wrap the edges of the fabric around the cork and attach the fabric to the backing using a staple gun or glue gun.  This part was a little tricky because you want to make sure there isn't a lot of excess fabric around the edges.  The excess fabric will affect how well everything will fit into the frame so you want to make sure to trim as much fabric off as you can.  Also, make sure your fabric is aligned so that the pattern on your fabric looks straight...unless you don't mind the crooked look...then you know, you do you boo!


5.  Put everything into the frame and voila!


I hope you liked this simple project and decide to try it out for yourself!  I don't think I've typed "cork" more in my life so I hope that counts for something..haha!  I will be using my pinboard for inspirational quotes and pictures.  Let me know if you decide to try this project of if you'd like to see more simple DIY projects like these!


Saturday, February 14, 2015

'FolkArt Home Decor Chalk' Paint Review

I know you've heard me rave about how great Annie Sloan Chalk Paint (ASCP) is on my blog.  I still think it's one of the best furniture paints I've tried.  But, guess what?  I recently discovered FolkArt Home Decor Chalk paint during a trip to JoAnn's.


The bottles were sitting at 2 different end caps on opposite ends of the store.  After passing the first end cap, I was intrigued, but after seeing the bottles again on the second end cap? I had to grab one.  Kudos to the zoning team at JoAnn's!


For starters, FolkArt describes this paint as an ultra matte acrylic paint.  The finish is truly matte and chalky, which is similar to the finish of Annie Sloan Chalk Paint.  The formulas for the FolkArt paints are slightly more runny compared to ASCP and the formulations for their waxes are totally different. Like ASCP, FolkArt offers a clear wax and a dark wax.  But the similarities stop there.  ASCP wax is a soft wax that is solid for the most part and softens as it's rubbed into your piece of furniture.  FolkArt wax, on the other hand, is very runny and gooey (similar to watered down Elmer's glue).  If you ask me, I like applying the FolkArt wax more than I do Annie Sloan's.  With the FolkArt wax consistency, I am able to apply the wax with a foam brush like paint because it is that liquid-y.  I just have to make sure that I'm spreading the wax as thinly and evenly as possible across my entire piece of furniture.  Once the wax dries, it can be buffed with a soft cloth to produce a shinier finish (like Annie Sloan's wax).

See how thin the FolkArt Home Decor Wax is?  
The major benefits I see for the FolkArt paint are availability and pricing.  FolkArt is available at JoAnn Stores at $7.99 for an 8 oz. bottle!  The price point is actually comparable relative to the size of ASCP, except ASCP is available in 32 oz. cans and they have smaller sample-sized jars.  I like FolkArt's 8 oz. bottle option better only because there are times when I work on small projects and I need more than a sample-sized jar of ASCP, but definitely less than 32 oz..

An antique sign I made using FolkArt Home Decor Chalk paint!


Overall, I really like FolkArt Home Decor Chalk paint.  If you have a hard time finding ASCP or the 32 oz. can just seems to be out of your budget for a small project, then I definitely recommend trying the FolkArt Home Decor Chalk paint.  Don't get me wrong, ASCP is still awesome and I will continue using it when I paint furniture, but the availability of the FolkArt paint can't be beat. The variety of colors makes it a true competitor for ASCP.  Also, how easily the wax can be applied makes it the #bombdotcom!  Stick around and I'll show you how I made the antique sign!

Thursday, February 12, 2015

Last Minute Valentine's Day Gift Ideas for Your DIY-er

Valentine's Day is tomorrow! Have you gotten your loved one a gift yet?  Yes, a dinner date with flowers and a romantic movie is definitely a cute idea and I don't know anyone who wouldn't love that, but are you looking to give your lover something more?  If so, I've got you covered!  Here are some of my Valentine's Day gift ideas for the DIY-er in your life!


I will be providing links to each of these items, but because these are last minute gift ideas they can actually be found at your local hardware store, department store, or book store.  Remember that these are only ideas and guides.  Similar items of any brand would make awesome gifts.

Disclaimer:  These are also affiliate links to Amazon.  If you do not feel comfortable supporting me by clicking on the links, just feel free to search the world wide web for the same items! Much love would be appreciated though!

1. Kobalt 7-1/4-in Sliding Compound Miter Saw:  I recently bought this same miter saw from Lowes.       It's awesome.  Yes, it is a small miter saw, but I didn't see myself needing anything larger than a sliding 7 1/4 inch saw.  I have used my saw to help build a 'Rustic X Console Table' following plans provided on Ana White's website.  This baby did great and my cuts were precise right out of the box!

2. Diptyque Baies Candle-6.5 oz.: I consider Diptyque candles to be luxury candles.  I've smelled them in department stores every time I walk by the counter, but have never had the guts to get myself to spend that much money on 1 candle.  This is a great gift, especially if your friend/lover wouldn't normally splurge on a candle like this!

After reading the online reviews, I have ordered the 3 of these coffee table books for my own home.  Looking at the colors on the covers and virtually flipping through the insides of the books through Amazon's website, these books seem to have great pictures with vivid colors.  The colors of the book covers are also so cute!  I think they would look great as a stack on anyone's coffee table.
3.Elements of Style: Designing a Home & a Life
4. The Perfectly Imperfect Home: How to Decorate and Live Well
5. Domino: The Book of Decorating: A Room-by-Room Guide to Creating a Home That Makes You Happy

6. X-mini WE micro portable NFC Bluetooth capsule speaker, Turquoise, XAM17-GM-TR:  My contractor once told me that his best tool on any job was his radio.  After working on a few DIY projects myself, I have found that the TV is my best friend.  When I'm working in the garage and the TV is not an option, playing Pandora on my phone keeps me entertained.  Having a small capsule speaker would definitely help project all that awesome music playing from your phone.

7. Kindle, 6" Glare-Free Touchscreen Display, Wi-Fi - Includes Special Offers:  I frequently use my own kindle to read when I want to relax or wind down for the night.  This would be the perfect gift for the person in your life who loves to read!

I hope my little gift guide has given you some great ideas about what to give your special someone.  Remember, this is only a guide and only you know your lover/loved one best!  Have a wonderful weekend and remember to celebrate love everyday!

Friday, February 6, 2015

Starter Stories with Urban Compass

Well, hello there!  I decided to take a little break from blogging to evaluate the types of projects I wanted to share and the types of posts I wanted to write.  Then I got sick.  I am still sick, but today I wanted to give you what I call a "mini progress tour" and share my thoughts on the work I've done on my home so far.  This post will also be a part of Urban Compass's Starter Stories Project.

Let me start my tour by prefacing that none of the spaces are done, done.  There's still a lot of work I want to put into each and every room.  I feel like I am forever organizing and reorganizing spaces and the idea of having finished spaces just seems so far away.  I purchased my home about a year and a half ago.  This baby of mine was definitely a fixer upper and that was exactly what I told my Realtor I wanted.  I was so inspired by home decor and DIY blogs that I wanted my very own place to put my personal touches on!

Lets start with my living room...

There were 2 doors that led to my bedroom, 1 from the hallway and the other from the living room.  The first thing I did was close up the doorway leading to my bedroom from the living room and refinish the floors.  I also painted the walls a lighter, neutral grey.

One of the quirky things I first noticed about this house was that most of the doors opened the opposite way.  So for example, if I were to stand in my bedroom or office, I would be pushing the door open instead of pulling it open.  Totally weird, which is why I replaced my bedroom and office doors in addition to my front door.  There were also a couple of random bookshelves found throughout the house that I closed up to make better use of the wall spaces.

The next room I want to show is my kitchen.  If you have read my blog from it's beginning (you know, all of 12 months ago?) then you would recognize these pictures.


The kitchen was a total gut job.  Most of the cabinets and floor tiles were broken or severely damaged.  Instead of attempting to DIY my entire kitchen, I hired a contractor.  Believe me, I know my limits.  I have since added a drink station to the kitchen, but I want to wait a couple of weeks before I reveal the entire space.  Stay tuned for that!

I also personalized the front of my home by painting my front door blue, adding a bright yellow bench, and planting potted flowers.


I love my little house!  It took months for me to find a place I loved, but as soon as I walked through this house, I knew it was going to be mine.  Having my very own place motivates me to put my personal touch on everything, without having to answer to a landlord or constantly wondering if my decorating designs would affect my rental deposit.   I won't lie and say that the entire journey as been so very pleasant and stress-free, but I will say that I'm proud of everything I've done so far! Stick around because I've just built a new console table and put together a new drink station and I'm so excited to share it with you!