Thursday, January 30, 2014

DIY Cable Box Cover

My TV sits on top of my fireplace mantle, but with the lack of proper entertainment storage, my cable box, modem, and router are all exposed.

Notice how all the entertainment equipment is just sitting on top of the red cabinet.  BLEH!

My solution was a cable box cover/hider!


I was inspired by ideas from Raising Rubies and New House to Home for cable box covers.

Supplies needed:

  1. Sturdy, decorative box with lid (a box made out of cardboard would be best because it would be easier to cut vs. plastic or metal)
  2. Decorative metal sheets from Home Depot or any arts and crafts store
  3. Metal Snips
  4. Spray paint
  5. Utility knife


Steps:
1.  Use a utility knife to create an opening for the cables and wires on the back of the box.


2.  Cut another opening on the opposite side of the box big enough to allow the signal from your remote too reach your cable box like so:


3.  Measure and cut the decorative metal sheet so that it is large enough to cover the opening on the front of the box.

4.  Spray paint the decorative metal sheet with the color of your choice.

Color:  Valspar, Hotel Vanilla
5.  Attach the metal sheet to the front of your box with a hot glue gun and you're done!

Everything is hidden!  
There you have it!  In 5 easy steps, I was able to create my own cable box cover in less than an hour (including spray paint drying time).  I think the space on top of my red cabinet looks a million times better than it did before.  Now, I just have to figure out how to hide the black cables going from my TV to the cable box.  Let me know if you have any ideas!

Friday, January 24, 2014

Valentine's Day Decor with....Soap?!?

I like to decorate for different seasons/occasions/holidays with simple items.  I don't believe your decor always has to SCREAM at you to make you feel like its going to be Valentine's Day or Christmas or Spring..ya know?  I also like to keep my decor simple because I'm honestly too lazy to pack and unpack multiple decor items for every occasion.  This is why for Valentine's Day, I like to sprinkle more reds and pinks throughout my home.

While perusing Cost Plus World Market today, I looked through their Valentine's Day section and saw these boxes of rose buds.


I first thought they were potpourri and immediately grabbed them because I thought they would look great in the 2 apothecary jars I have in my home already.  However, when I looked at the label, I realized they were soap!

These boxes of soap petals were from World Market, $7.99 ea.
I put the boxes back on the shelf, but after walking around the store for another 20 minutes I decided to put the boxes back into my cart.  They were just too cute to pass up and if they didn't work in the apothecary jars I had planned for them, I would just put them in a dish to use as decor in the restroom (which is probably what they were really meant for).

So this is how I ended up filling my apothecary jars...


I like the contrast of the delicate rose buds with the pinecones in the apothecary jars.
And this is how my entry way table looks so far...


Sunday, January 19, 2014

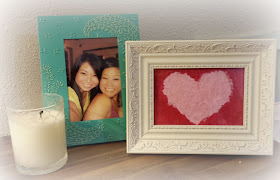
DIY Valentine's Day Framed Art

This is a quick and easy Valentine's Day decor project anyone can make with leftover tissue paper from Christmas, a 4x6 notecard, and a picture frame.


Supplies needed:

  1. Picture frame
  2. 4x6 notecard, or cardstock, or old christmas card
  3. Tissue paper 
  4. Mod Podge or any type of glue

Directions: 
  1. Tear tissue paper into small pieces of any shape and size (the more random, the better)

  1. Apply Mod Podge or glue onto notecard in the shape of a heart

  1. Apply tissue paper pieces onto glue to create a heart shape.  

Feel free to layer the tissue paper so that you are completely covering the notecard or cardstock.
For me, I also used the darker pink tissue paper in the area surrounding the heart because I wanted something that was a little brighter.  I like this project because it's quick and easy, handmade, and inexpensive.   Also, it's meant to look a little messy and hand-crafted so don't worry about staying in any lines or being perfect.  Have fun!


It looks perfect next to a picture of my sister and me!


Saturday, January 18, 2014

A kitchen in progress!

Happy Saturday!  Today, I want to show you what I've done with my kitchen so far.  Remember this before photo I showed you in the last post???


I originally thought my kitchen could be saved and the kitchen cabinets could be refinished.  However, after walking through the house with the home inspector, he noted:

  1. multiple cracked floor tiles
  2. half of the kitchen drawers didn't pull out straight
  3. the granite wasn't properly installed
  4. the range hood was hard-wired into the electrical outlet (not sure how dangerous this was, but all the contractors who came by said it was bad)
  5. the bay window above the sink had noticeable water damage
  6. the dishwasher located in the island wasn't functioning properly due to bad electrical and plumbing work
So....after reading the home inspection report, I decided it would be safer for me to demo everything to the studs and have licensed professionals reinstall everything correctly.  The demo crew came in and did their thing and after 4 hours we were left with this...


Then a few days later I had my Ikea cabinets installed by my contractor.  I built the actual cabinets myself by following their directions, but I left the job of the actual cabinet installation to the pros.  I opted for Ikea cabinets with their Lidingo style drawers and doors.  Also, I originally wanted my entire backsplash to be solely made up of subway tiles, but my contractor suggested adding a strip of accent tiles with red tones to tie in the backsplash with the color of my granite.


And now, the kitchen looks like this...

and this...


In the end, I am very happy with the results.  I was able to remodel my kitchen with the look that I wanted and still stay within the budget I set for myself.  However, I don't feel like the kitchen is done yet.  I'm on the hunt for cool kitchen wall art.  Let me know if you see anything that would suit the walls of this kitchen!


Saturday, January 11, 2014

And so it begins!

I want to show you guys what my house looked like 4 months ago when I first got the keys.  These were some of the listing pictures used on multiple listing sites for my home.


I fell in love with my home the moment I walked through it.  It wasn't what I pictured my dream home to be, but it had good bones and I knew I could turn it into something really awesome.  

This is what the kitchen looked like when we started painting and refinishing the floors!  

Because the wood floors were being refinished, the kitchen became the dumping grounds for everything.
My home is a 2 bedroom, 1.5 bath cottage style house.   I have a detached garage and a little grass area for my dogs to play.  It's the perfect fixer-upper starter home for me!  I can't wait to show you the changes I've made in the last few months.